A quick start guide to amplifier settings

This is a basic starting point guide for the settings on your amplifier or head unit regarding cut/boost, crossover points, Q-factor or slope, and phase. This guide is simply meant to give you somewhere to start for a decent response. You'll need to tweak the settings yourself to get the sound you want, but since I see so many people asking how to set all the switches, dials, and knobs on their amplifier, I figured I'd write this to save myself re-typing the same responses over and over again. On the side, top, or end of your amplifier, you will most likely find a number of these dials and switches with various labels. Here are a list of the common settings available, what they actually mean, and how to adjust them for an initial setting:
If you are setting an amplifier for a subwoofer (or more than one subwoofer):
FULL/LPF/HPF: This is a setting that tells the amplifier what frequencies to pass on to the speakers connected to the amplifier you're adjusting. "Full"
FULL is full range (all frequencies)
HP is "High Pass" or anything above the specified frequency will be passed on to the speakers
LP is "Low Pass" or anything below the specified frequency, which is set on a separate dial.
For subs, you will want to select the LPF setting.
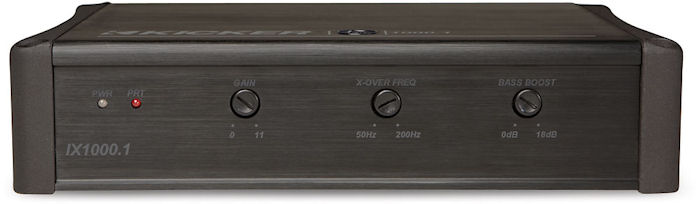
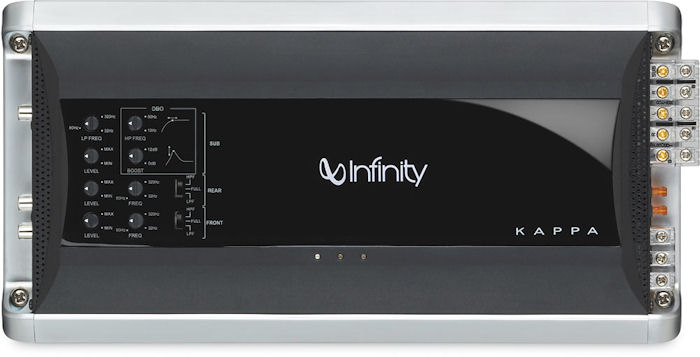
XO (CROSSOVER) FREQ or FREQUENCY: This sets the frequency at which the sound will begin to diminish in volume beyond this point.
For subs, you will want to start with a setting of 50Hz. If this seems a bit low, you can try increasing to 60Hz after trying an initial setting of 50Hz.
CUT/BOOST: This is an equalization setting, usually centered somewhere around 40Hz. This can add distortion and cause clipping if the setting is turned too far up. I suggest leaving this set to zero, or "off."
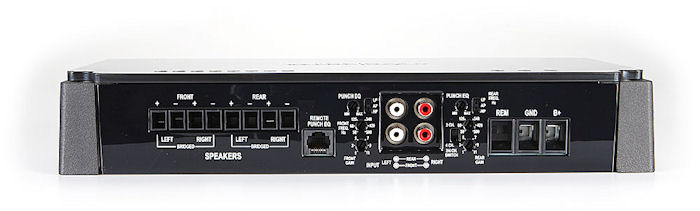
BRIDGED: This setting is for multi-channel amplifiers, and allows you to combine two amplifier channels to drive one speaker with the combined power of both channels. If an amplifier is 2 ohm stable in stereo, it will be only 4 ohm stable when bridged. Unless you need to bridge the amplifier, leave this button or switched turned off.
Q-FACTOR (SLOPE): This setting works in conjunction with the crossover point to determine how quickly the volume of your music will decrease as frequency extends beyond your crossover point. For a subwoofer, set this to 18dB/octave.
PHASE: The phase setting synchronizes the phase of your subwoofer output to that of the other speakers in the car. This topic is a bit complex to explain, but most amplifiers have a switch for 0 or 180 degrees. Set your amp to 0 and listen to a track with some bass. Afterward, set the Phase setting to 180 degrees, and see if the bass output improves or becomes worse with the same track. Leave the switch set to whichever setting yields the best results.
GAIN or INPUT SENSITIVITY: This setting is used to balance your amplifier's input impedance or level to that of your line voltage from the ehad unit or line driver.
In order to set the gain properly, please refer to my page on how to set amplifier input sensitivity. If you need an initial setting before dialing this in properly, set the gain dial to "minimum sensitivity" or the highest voltage setting listed (usually all the way counter-clockwise.) Next, turn the dial one-quarter turn up, and start from here. I would not suggest turning the gain any higher than half-way on the first try without using a DMM to set the gain properly.
If you are using a separate amplifier for your component speakers:
FULL/LPF/HPF: This is a setting that tells the amplifier what frequencies to pass on to the speakers connected to the amplifier you're adjusting. "Full"
FULL is full range (all frequencies)
HP is "High Pass" or anything above the specified frequency will be passed on to the speakers
LP is "Low Pass" or anything below the specified frequency, which is set on a separate dial.For components, separates, 6x9s, coaxials, etc., you will want to select the HPF setting.
XO (CROSSOVER) FREQ or FREQUENCY: This sets the frequency at which the sound will begin to diminish in volume beyond this point.
For midrange speakers, you will want to start with a setting of 100 to 125Hz. For midbass drivers (7" and 8") set HPF to 80Hz
CUT/BOOST: This is an equalization setting, usually centered somewhere around 40Hz. This can add distortion and cause clipping if the setting is turned too far up. I suggest leaving this set to zero, or "off."
BRIDGED: This setting is for multi-channel amplifiers, and allows you to combine two amplifier channels to drive one speaker with the combined power of both channels. If an amplifier is 2 ohm stable in stereo, it will be only 4 ohm stable when bridged. Unless you need to bridge the amplifier, leave this button or switched turned off.
Q-FACTOR (SLOPE): This setting works in conjunction with the crossover point to determine how quickly the volume of your music will decrease as frequency extends beyond your crossover point. For midrange, set this to 12dB/octave.
PHASE: The phase setting synchronizes the phase of your subwoofer output to that of the other speakers in the car. This topic is a bit complex to explain, but most amplifiers have a switch for 0 or 180 degrees. Set your amp to 0 (zero) or "off."
GAIN or INPUT SENSITIVITY: This setting is used to balance your amplifier's input impedance or level to that of your line voltage from the ehad unit or line driver.
In order to set the gain properly, please refer to my page on how to set amplifier input sensitivity. If you need an initial setting before dialing this in properly, set the gain dial to "minimum sensitivity" or the highest voltage setting listed (usually all the way counter-clockwise.) Next, turn the dial one-quarter turn up, and start from here. I would not suggest turning the gain any higher than half-way on the first try without using a DMM to set the gain properly.
If you are setting an amplifier to run your door or package shelf speakers with NO subwoofer present, use the following settings:
FULL/LPF/HPF: This is a setting that tells the amplifier what frequencies to pass on to the speakers connected to the amplifier you're adjusting. "Full"
FULL is full range (all frequencies)
HP is "High Pass" or anything above the specified frequency will be passed on to the speakers
LP is "Low Pass" or anything below the specified frequency, which is set on a separate dial.
For components, separates, 6x9s, coaxials, etc., you will want to select the FULL setting. If you find that your spakers distort from the bass, then set this to, "HPF."
XO (CROSSOVER) FREQ or FREQUENCY: This sets the frequency at which the sound will begin to diminish in volume beyond this point.
For full-range speakers, this setting will be bypassed with the XO set to "FULL." If you select "HPF," then set this to 80Hz.
CUT/BOOST: This is an equalization setting, usually centered somewhere around 40Hz. This can add distortion and cause clipping if the setting is turned too far up. I suggest leaving this set to zero, or "off."
BRIDGED: This setting is for multi-channel amplifiers, and allows you to combine two amplifier channels to drive one speaker with the combined power of both channels. If an amplifier is 2 ohm stable in stereo, it will be only 4 ohm stable when bridged. Unless you need to bridge the amplifier, leave this button or switched turned off.
Q-FACTOR (SLOPE): This setting works in conjunction with the crossover point to determine how quickly the volume of your music will decrease as frequency extends beyond your crossover point. For midrange, set this to 12dB/octave.
PHASE: The phase setting synchronizes the phase of your subwoofer output to that of the other speakers in the car. This topic is a bit complex to explain, but most amplifiers have a switch for 0 or 180 degrees. Set your amp to 0 (zero) or "off."
GAIN or INPUT SENSITIVITY: This setting is used to balance your amplifier's input impedance or level to that of your line voltage from the ehad unit or line driver.
In order to set the gain properly, please refer to my page on how to set amplifier input sensitivity. If you need an initial setting before dialing this in properly, set the gain dial to "minimum sensitivity" or the highest voltage setting listed (usually all the way counter-clockwise.) Next, turn the dial one-quarter turn up, and start from here. I would not suggest turning the gain any higher than half-way on the first try without using a DMM to set the gain properly.