How to Set Amp Gains with a DMM
I’ve realized lately that although we recommend to many people that they should set the gain on their amp with a digital multi-meter (dmm), most may not know how. Although there is a lot of information out there on “how to”, most of it is jumbled with mathematical equations that some may not be able to understand and then they just give up.
Here’s what you’ll need:
1) Digital Multi-meter that reads AC voltage (also called True RMS) (this does not have to be an expensive model, in fact most $15 models have this feature)
2) Calculator that has a square root button (looks like a little check mark with a tail, this also can be a cheap dollar store item as long as it has that button)
Use this equation to figure out voltage power output:
- Take the RMS wattage per channel and multiply by speaker(s) ohm load
- Now take that number and push the square root button on the calculator
Example: 50 Watts RMS x 4ohm load = 200, square root = 14.142135
So the voltage reading for our example on the digital multi-meter should be 14.1
Remove positive wire speaker wire from the amp (while some say this is not necessary, I recommend so as not to accidentally cross the positive and negative wires)
Next with your system turned “OFF”, turn the gain all the way down (counter clockwise)
Side note: Although Bass Boost is something that most do not recommend using, if intend to use this feature, turn Bass Boost “ON” after turning your gain down.
Now turn your head unit (stereo) “ON”, make sure that all equalization features (bass, treble, etc.) are set to Zero (0)
Set your head units volume to 85-90% - while some prefer to suggest 75%, I recommend 85-90% since most listen to music at no higher than 75% and this gives plenty of room to use equalization features later (remember that every adjustment on the head unit will adjust the voltage value and even though you thought you had it set correctly, the speaker(s) may receive a clipped signal once you increase any equalizing features (bass, treble, etc.)
Play a test tone 50-60hz (if you do not have a cd, tape, etc with a test track, then play your favorite song with similar features)
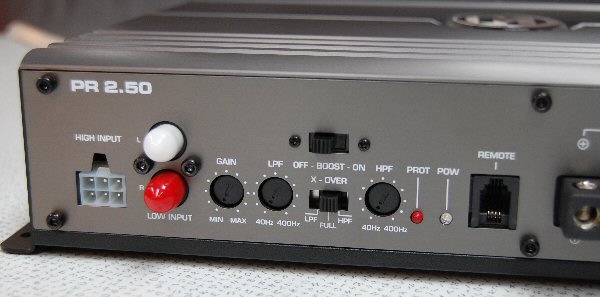
While playing the test track, use the dmm (set to AC voltage) on the positive output of the amp and slowly adjust your gain until it displays the voltage that you figured out earlier.
Now turn your head unit down and then shut “OFF”, re-install positive speaker wire to amp
You have successfully set the gain on your amp with a digital multi-meter and you may now turn your system up to a comfortable listening level (50-75%) and adjust equalization features to your liking.
Most audio equipment dies for one simple reason. Many people push their equipment beyond its limits. Whether it is the amplifier, subwoofer or full range speakers, clipping is the number one cause of failure. To prevent clipping, make sure you have an adequate electrical system, and use this tutorial.
To figure out what voltage you should set the gains to, multiply the RMS power of the amplifiers output by the impedance of the speaker, then find the square root of that number. If you are using an amplifier that has an RMS rating of more than your speaker(s) are rated for, then use the RMS rating of the speaker (instead of the RMS of the amplifier) to determine the voltage setting for your amplifier's gain control.
Gain Setting Equation
Voltage of the output = sqrt(RMS Power X impedance of the speaker)
- Example
Say the amp provides 100WRMS into a 4 ohm speaker:
Voltage = sqrt(100W X 4 ohms)
Voltage = sqrt(400W*ohms)
Voltage = 20V
Again, that was only an example, use the ratings of your amp to figure that out.
Setting the Gain(s)
To set the gain(s), you need two things:
- 1. A DMM (digital multi-meter) that is capable of measuring AC voltage (needs to be able to measure up to a range of 200V).
2. A test tone CD to use to set the gains at the correct setting.
Now, to set the gain(s):
- 1. Start the vehicle, and pop the test tone CD in the head unit.
2. DO NOT hook up the sub(s) or speaker(s) to the amplifier while doing this, just leave the outputs unused at this time.
3. Now, time to set up the head unit.
- a. If the loudest you listen to your music at on a regular basis is 22/35 with bass @ +3 and treble @ 0 with MX (or any other sound processor) on, use those settings. NEVER turn the headunit above 3/4 of the maximum volume.
b. Remember to have the car turned on.
c. If you want to use bass boost on a sub amp, set it prior to setting the gains on the amp and use the center frequency of the bass boost (45 Hz for most amps) as your test tone.
d. Please remember that if you have a subwoofer volume control on the headunit and/or a bass knob for the amplifier, set it to the maximum before you set the gains on the sub amp.
4. Take the leads from the DMM and but them on the outputs from the amp.
5. Set the gain so that the outputs of the amplifier equal the voltage you found above. This is a MUST.
Here is JL Audio tutorial on their site:
http://www.jlaudio.c...ensitivity.html
Here is where you can download some test tones for system testing/gain setting:
http://www.ronelmm.com/tones/
http://www.eminent-t...imediatest.html
For test tones higher than 80Hz, download this program and you can create your own:
Adobe Audition Trial Version
It is best to use 50 Hz tone for a sub amp (unless you have bass boost, use the frequency that is boosted as the tone), and a 1kHz tone for a full-range amp.
This is a good way to set the gains, but if you have access to an oscilloscope, by all means use it. Then you can set the gains to their absolute maximum as you can see when the amplifier clips.
If you are wondering what exactly clipping is, and what it looks like, read this:
http://www.bcae1.com/2ltlpwr.htm
Enjoy, and remember to thump responsibly!
|
